
Google Pay
Introduction
Google Pay allows customers to checkout with cards saved on their Google accounts via the web. Neon Pay provides an easy-to-use checkout experience powered by Google Pay.
Terms and Conditions
By using Neon Pay JS to integrate Google Pay into your checkout process, you agree to and must adhere to the Google Pay APIs Acceptable Use Policy and accept the terms defined in the Google Pay API Terms of Service.
Supported Authorization Methods and Card Networks
Neon Pay supports the following card networks in the US for charging:
- American Express
- Discover
- MasterCard
- Visa
How It Works
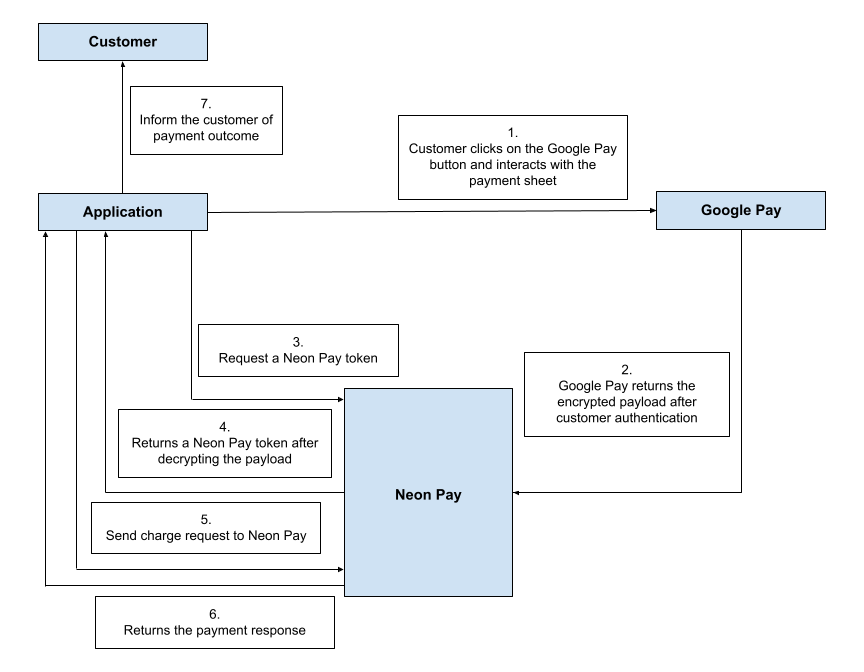
- Customer interacts with the Google Pay button rendered into the form by Neon Pay JS, thus authorizing the purchase
- Application requests a Neon Pay token via the Neon Pay JS API
- Neon Pay JS sends the encrypted payload to Neon Pay’s servers, which will decrypt card information for tokenization.
- Neon Pay sends a Neon Pay token to your application
- Application sends a charge request to Neon Pay’s Charge API
- Neon Pay sends the application the payment response
- Application informs their customer of the payment outcome
Prerequisites
The Neon Pay merchant must first have Google Pay enabled. Currently, it can be enabled in two ways. Neon Pay Support staff have the ability to enable it on behalf of clients from within the Neon Pay portal. Developers also can enable Google Pay processing on behalf of merchants connected to their application through an UPDATE Merchant request to the Neon Pay API.
Neon Pay JS is only configured to allow for Neon Pay as the Google Pay gateway. The Neon Pay merchant ID will thus be automatically passed as the gatewayMerchantID. No further configuration is required on the developer’s part.
Google Pay is only available through Neon Pay JS version 1.2 or later.
Integrate through Neon Pay JS
The Google Pay button can be added to your payment page as a standalone option, with or without the standard credit card fields provided by Neon Pay JS.
- If you do not already have one, generate a public API key for your application within the Neon Pay portal.
- Initialize the Neon Pay JS and the field object for Google Pay in your payment form, see a developer example here. This will add the Google Pay button through an IFrame, which your customer will be able to interact with.
Remember! When offering Google Pay as an option, the button should be placed at equal prominence as other payment options according to the Google Pay Brand Guidelines. - Generate and catch the Neon Pay token via Neon Pay JS’s createToken API method.
We highly recommend that developers pass billing information as additional token information. This will decrease the risk of a charge not being authorized because of issues in cardholder address verification.
Your application will not need to handle or interact with any encrypted Google payment or transaction data. Neon Pay JS is responsible for decrypting that information for tokenization. In return, your application will receive a secure token and basic card information. - Use the Neon Pay token in your application’s request to Neon Pay’s Charge API.
- Handle any errors and inform your customer about the payment’s outcome.
<form id="paymentForm" action="#" method="POST">
    <h2>Payment Form</h2>
    <div id="googlePayButton"></div>
    <input type="hidden" id="token" value="" />
    <input id="paymentSubmit" type="submit" value="Process Payment" />
</form>

<script src="https://cdn.sbx.neononepay.com/3.0/neonpay.js"></script>
<script type="text/javascript">
    // Set up the NeonPay fields on your form
    var neonpay = new NeonPay('public_f8564752122b08cc9c20c374562d5cc7', '19', {swipe: true});
    var googlepay = neonpay.createField('googlepay', {price: '25.00'});

    (async () => {
        // Check if merchant can process payments first
        const result = await neonpay.canMakePayments();

        if (result) {
            googlepay.mount('#googlePayButton');
        } else {
            // There was an error and the payment is not possible for this configuration
            document.querySelector('#googlePayButton').style.display = 'none';
        }
    })();

    var paymentForm = document.getElementById('paymentForm');
    var tokenField = document.getElementById('token');

    // Intercept form submission and retrieve token
    paymentForm.addEventListener('submit', function (event) {
        event.preventDefault();

        var tokenData = {
            first_name: 'Robert',
            middle_name: 'Norman',
            last_name: 'Ross',
            email: 'bob@ross.net',
            phone: '+18888606366',
            address_line_1: '4545 N. Ravenswood Ave.',
            address_line_2: '2nd Floor',
            address_city: 'Chicago',
            address_state: 'IL',
            address_zip: '60640',
            address_country: 'US'
        };

        var token = neonpay.createToken(googlepay, tokenData).then(function(result) {
            // Pass the token to your Charge API call using
            // a hidden input that your form will serialize
            // or to an intermediary API on your server
            if (result.token) {
                tokenField.value = result.token;
            }
        });
    });
</script>
Securing Payments through 3DS
Neon Pay does not currently support card payments through 3DS.
Testing Your Integration
Google Pay is supported within Neon Pay’s sandbox environment. Please develop and test your integration through the sandbox version of Neon Pay JS, available at https://cdn.sbx.neononepay.com/3.0/neonpay.js.
When you’re ready to integrate for production, use https://cdn.app.neononepay.com/3.0/neonpay.js.
Test Cards & Neon Pay JS:
Google provides test cards so developers can run integration and API tests without needing a real credit card. Note that these are only available for the test environments (so sandbox). A real credit card is required in production environments. Check their documentation here for more information: https://developers.google.com/pay/api/android/guides/resources/test-card-suite.